With the warm spring weather of Spring, the seeding season has arrived. Anyone who owns a large area of land, mostly referring to professional groundskeepers, who find traditional seeding methods ineffective may want to look into hydroseeding. In the following article, we have assembled a comprehensive guide that will guide you through the process of hydroseeding, giving you all the crucial information before you give this technique a shot.The hydroseeding process and equipment.
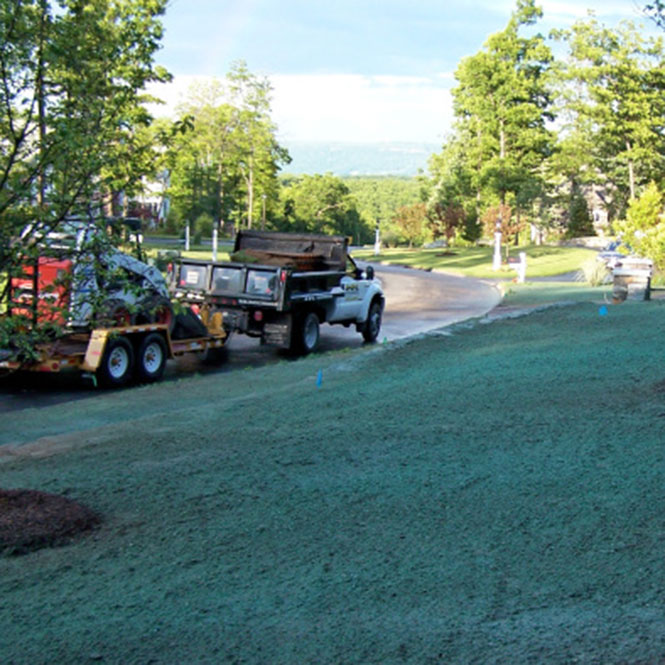
Firstly, let’s define the method of hydroseeding. Hydroseeding is a planting process that begins with mixing grass seeds, fertilizer, binding agent (tackifier) to prevent run off on steep surfaces and other optional elements such as natural wood fibers, binding agents, and water to create a mix. Before we spread our mix to the designated area, we must make sure to prepare the ground by adding a new layer of soil that we’ll apply at a minimum depth of two to three inches. Ideally then machine grade the soil and level it, preventing any water runoff accidents for the duration of the process. At that point, our ground is ready, and we can begin hydroseeding. In most instances, you’ll be hydroseeding with a hose and you’ll transport the slurry mixture with a truck or a trailer. However, it is possible to hydroseed a very large surface an aircraft.

Our Full Range of Hydroseeding Supplies
The mixture (grass seeds, fertilizer, natural wood fibers, binding agents, water, tackifier)Water transportation tankTruck/trailer/helicopter for tank transportationHydroseeding hoseMachine grader (soil leveling)
After the mix is applied, the ground dries, with wood fibers and binding agents connecting to the underlying soil, maintaining a solid position of the seeds. As time goes on, the growth and development of the grass we planted is encouraged by the fibers and the fertilizer previously included in the mixture. That would finalize the general analysis of the process, and now we’ll discuss its advantages and implications.Advantages and possible implications
When we talk about this method, one of the first advantages that come to mind is that it is much more applicable to large surfaces than other traditional forms of planting. Additionally, hydroseeding is especially efficient in seeding hardly accessible surfaces, most notable ones being sloped terrain and hillside terrain. In terms of the time it will take for seeds to grow, you’re looking anywhere from 5-7 days for the first signs of development, and 3-4 weeks for a fully established turf.
While the growth isn’t instant as in the process of sodding, the entire process of hydroseeding is much shorter than sodding, especially if we’re talking about a large area. Another major benefit of this method compared to sodding and traditional seeding is the cost. When we look at the cost of all of these methods, sodding is always much more expensive than hydroseeding. On the other hand, while traditional seeding requires lower initial investment, when you factor in all of the added benefits of hydroseeding, hydroseeding ends up as a much more cost-efficient method. While traditional seeding often has risks of evaporation, hydroseeding adds the moisture the slurry provides to the soil we’re planting, encouraging the growth of the grass. Furthermore, as we previously mentioned, fertilizer and fibers help the grass grow faster, but the added fibers have another advantage over other seeding methods.
Our Full Range of Hydroseeding Supplies
When sprayed, they maintain a dependable level of moisture over time, protecting the soil from drought stress while holding onto the water. It is also worth noting that you can mix multiple fertilizers if you want to maximise their potency and grow the grass in the shortest amount of time possible. While it may seem like a small detail, hydroseeding is superior to other seeding techniques because it is easily trackable. That is because the slurry contains a dye that will provide information to the seed spreader on the ground that was hydroseeded and the one that wasn’t. Last but not least, the fibers and binding agents we mixed in the slurry will hold the soil in place, preventing both the erosive effects of rain and water runoff. However, if you want to make an effective mulch barrier, make sure to protect the slurry from rain or irrigation for the first 24 hours after planting.
Another option with hydroseeding is the possibility to add a tackifier to your mixture, which is an organic matter designed to further tie the seeds to the ground. When it comes to possible implications, the first one that comes to mind is for any professional groundskeeper that is looking to seed a larger surface. This method is also very efficient for general vegetative renovating, the most practical uses being renovating the soil of construction sites and soil that was damaged by wildfire.
This can come in handy for civic nature workforce managers looking to restore healthy-looking soil. Additionally, like we previously mentioned, hydroseeding is effective in planting hillsides, mountains, and hardly accessible terrain alike. Last but not least, given that hydroseeding is very efficient in seeding large surfaces, community city parks, and zoos can be brought back to life by this method of seeding.